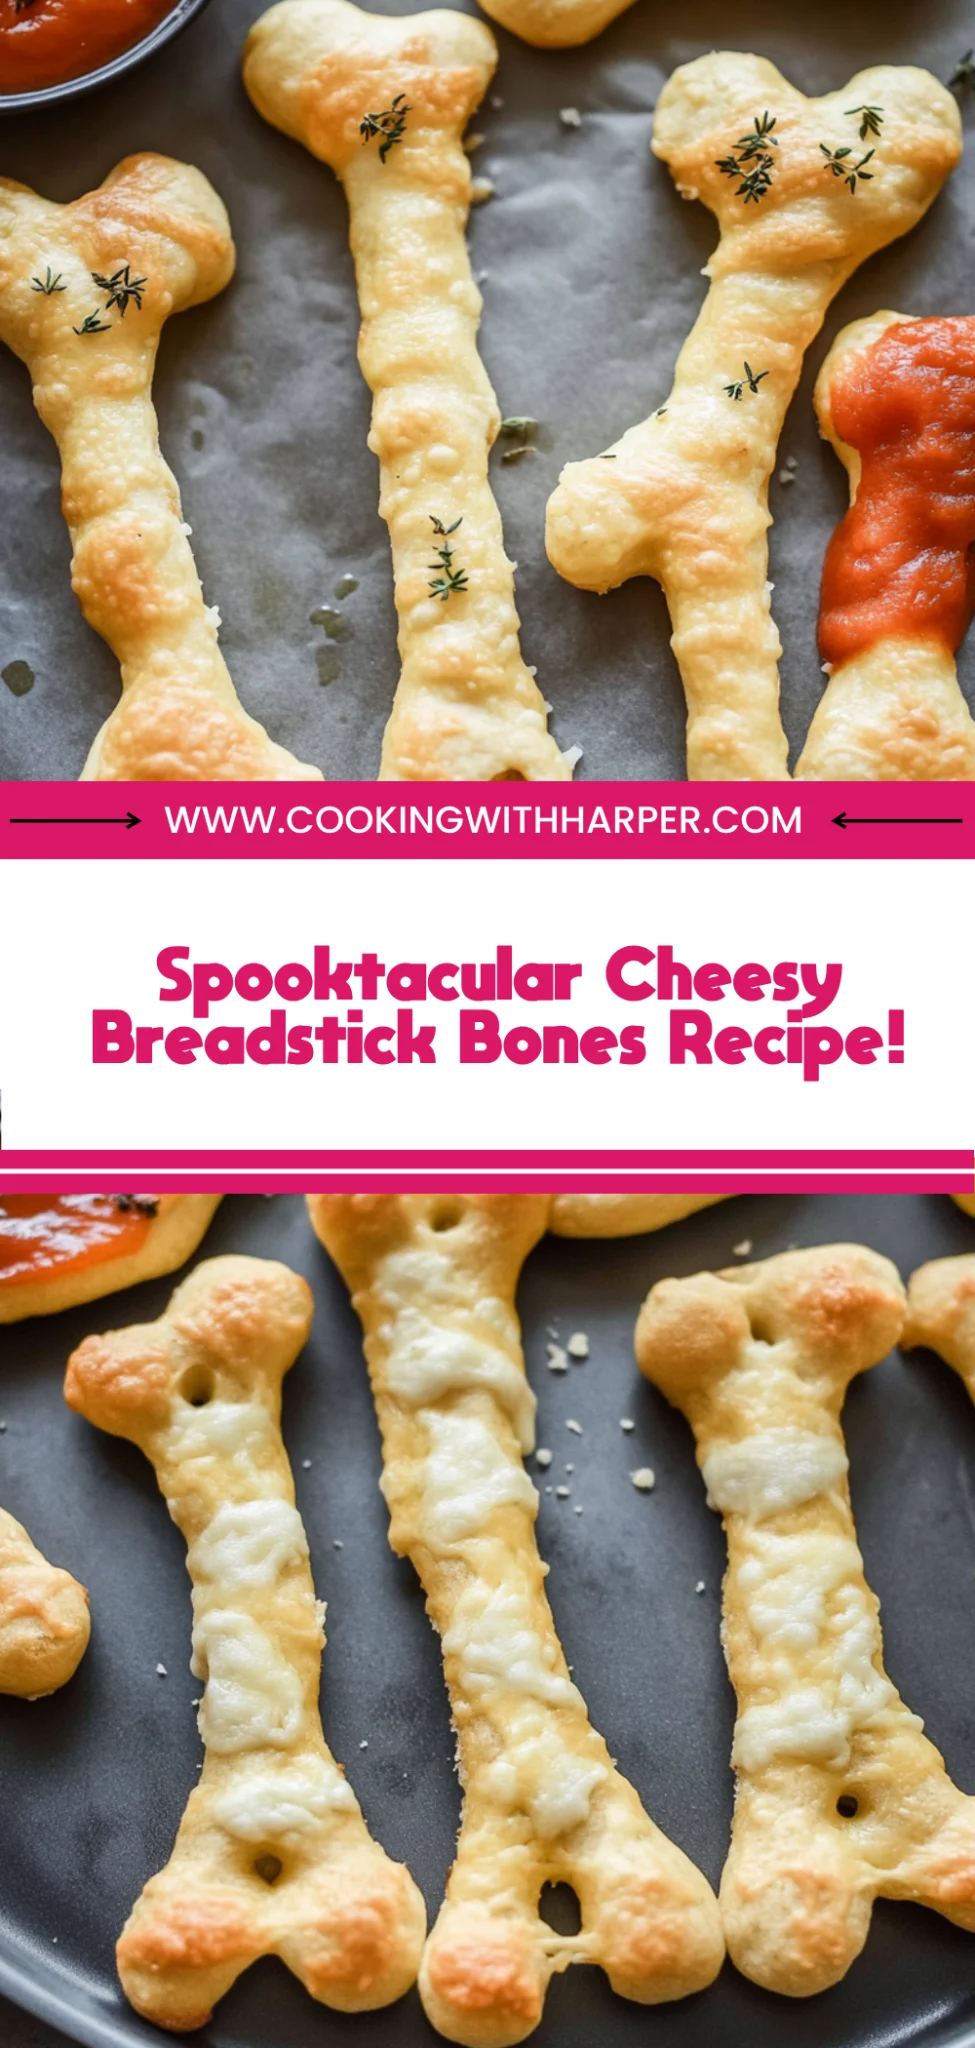
Cheesy Halloween Breadstick Bones: Spookily Delicious Treats
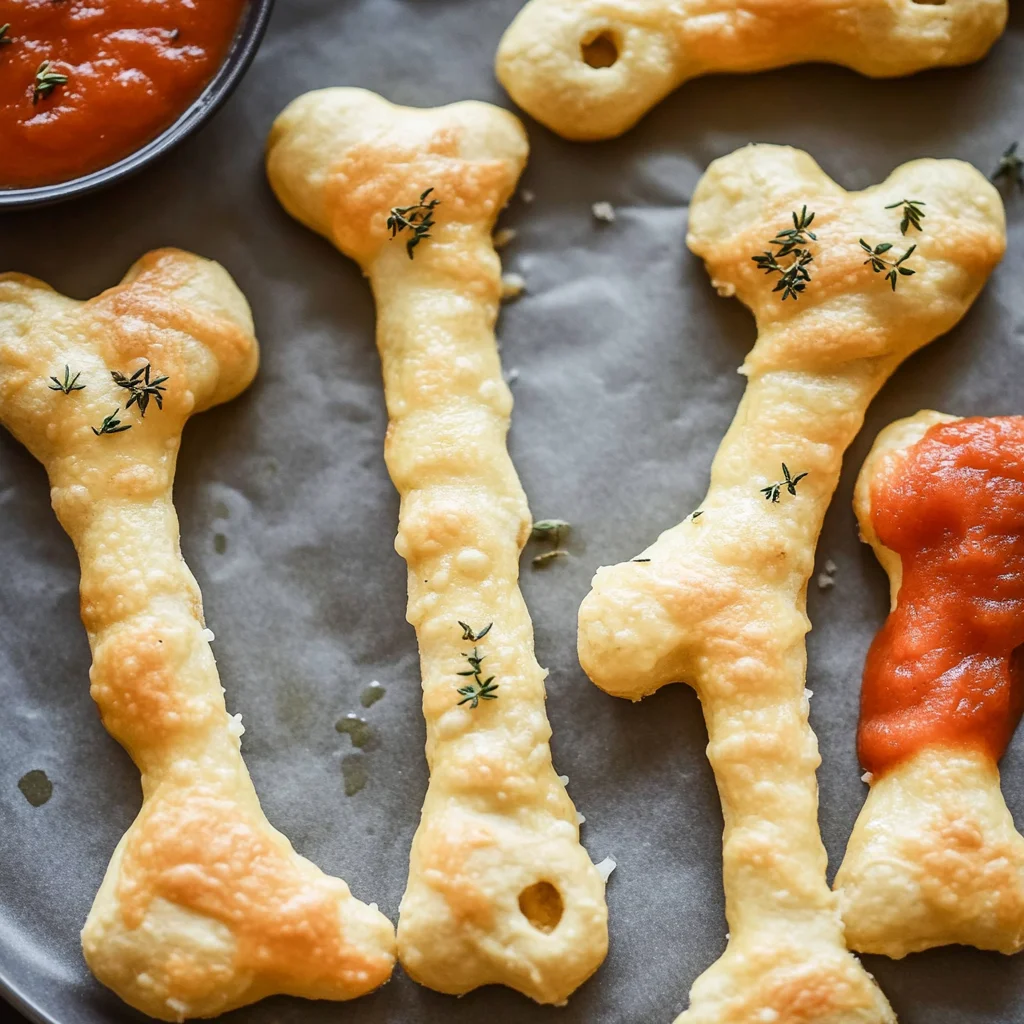
As the aroma of freshly baked bread fills the air, the sight of Cheesy Halloween Breadstick Bones transforms any gathering into a hauntingly delightful experience. These breadsticks boast a golden, crispy exterior that gives way to a warm, gooey center, creating an irresistible combination of textures and flavors. Perfect for Halloween parties or cozy family dinners, they evoke a comforting sense of nostalgia while adding an element of playful spookiness to the table.
What sets these bone-shaped delights apart is their luscious blend of cheeses, which melt beautifully to create an indulgent flavor profile that’s both savory and satisfying. A sprinkle of garlic and herbs elevates each bite, making them an ideal accompaniment to your favorite marinara or a bold pumpkin soup. Gather around with friends and family to share in this festive treat—each cheesy morsel is sure to spark joy and conversation as you celebrate the season together.
Why You’ll Love This Cheesy Halloween Breadstick Bones
These Cheesy Halloween Breadstick Bones are not only a feast for the eyes with their fun bone shape, but they also deliver an irresistible combination of textures and flavors that will delight your taste buds. The dough is made with warm water and active dry yeast, creating a perfectly fluffy and chewy base that contrasts beautifully with the gooey, melty cheese filling infused with garlic powder and oregano. As you bite into these delightful breadsticks, the aroma of buttery goodness mixed with a sprinkle of sea salt and fresh parsley elevates your senses, making them an ideal addition to any Halloween gathering. Trust me, once you experience the deliciousness of these spooky treats, you’ll want to whip up a batch right away!
What Kind of All-Purpose Flour Should I Use?
For the Cheesy Halloween Breadstick Bones, it’s best to use unbleached all-purpose flour. This variety provides a great balance of protein content that contributes to the dough’s elasticity and chewiness, resulting in perfectly soft and slightly crispy breadsticks. Unbleached flour also has a more robust flavor compared to bleached versions, enhancing the overall taste of your spooky creation. If you only have bleached all-purpose flour on hand, you can still use it; just be mindful that it may create a slightly softer texture, so avoid over-kneading to maintain the desired chewiness of your breadsticks.
Ingredients You’ll Need
Each ingredient in this dish plays an essential role in flavor and texture. Here’s what you’ll need:
- 1 cup warm water (110°F): Activates the yeast for a perfect rise.
- 2 teaspoons active dry yeast: Creates the light and airy texture of the breadsticks.
- 2 tablespoons sugar: Fuels the yeast and adds a hint of sweetness.
- 3 cups all-purpose flour: Forms the base structure for delightful breadsticks.
- 1 teaspoon salt: Enhances the overall flavor of the dough.
- 2 tablespoons olive oil: Adds richness and helps keep the breadsticks tender.
- 1 cup shredded mozzarella cheese: Melts beautifully for a gooey, cheesy center.
- 1 cup shredded cheddar cheese: Provides sharpness and depth of flavor.
- 1 teaspoon garlic powder: Infuses savory notes that elevate the overall taste.
- 1 teaspoon dried oregano: Adds a hint of earthy aroma and flavor to the filling.
- 2 tablespoons butter (melted): Gives a golden finish and rich flavor to the topping.
- 1 teaspoon sea salt: Sprinkled on top for an extra burst of seasoning.
- 1 teaspoon parsley (chopped): Garnishes with a fresh touch of color and flavor.
Step-by-Step: How to Make Cheesy Halloween Breadstick Bones
Activate the Yeast
In a mixing bowl, combine 1 cup of warm water (110°F), 2 teaspoons of active dry yeast, and 2 tablespoons of sugar. Allow this mixture to sit for about 5 minutes until it becomes frothy and bubbly. This step is crucial as it ensures your yeast is active and ready to help the breadsticks rise.
Form the Dough
Next, add 3 cups of all-purpose flour, 1 teaspoon of salt, and 2 tablespoons of olive oil to the yeast mixture. Mix everything together until a dough begins to form; it should be slightly sticky but manageable. Once combined, continue mixing until no dry flour remains.
Knead the Dough
Transfer the dough onto a floured surface and knead it for about 5 minutes until it becomes smooth and elastic. You’ll know it’s ready when it springs back lightly when poked. This kneading process develops the gluten, giving your breadsticks that perfect chewy texture.
Let the Dough Rise
Place the kneaded dough into a greased bowl and cover it with a cloth. Allow it to rise in a warm area for about 1 hour or until it has doubled in size. Look for a puffy, airy appearance; this means your dough is properly risen and ready for shaping.
Preheat the Oven
While the dough is rising, preheat your oven to 375°F (190°C). Line a baking sheet with parchment paper to prevent sticking and ensure easy cleanup later. This preparation step sets you up for efficient baking once your breadsticks are shaped.
Roll Out the Dough
Once the dough has risen, punch it down gently to release any air bubbles. Roll it out on a floured surface to about 1/2 inch thick. Aim for an even thickness throughout so that all breadsticks bake uniformly—no one wants undercooked or overcooked pieces!
Cut Bone Shapes
Using a knife or pizza cutter, cut the rolled-out dough into bone shapes. Be creative; you can make them as large or small as you like! Just ensure each bone shape has enough surface area to hold some cheese filling without tearing.
Fill and Seal
Place a small dollop of your cheese filling—made with equal parts shredded mozzarella and cheddar mixed with garlic powder and dried oregano—in the center of each bone shape. Fold the edges over carefully to seal in that cheesy goodness, pinching them firmly so they don’t open during baking.
Butter and Season
Brush the tops of your shaped breadsticks with melted butter using a pastry brush. Then sprinkle with sea salt and chopped parsley for added flavor and visual appeal. This buttery topping will contribute to that beautifully golden finish you’re aiming for.
Bake Until Golden
Carefully place your prepared breadsticks in the oven and bake for about 15 minutes, or until they are golden brown on top. Keep an eye on them towards the end—when they achieve that deep golden color, they are ready to be taken out.
Cool Before Serving
Remove the breadsticks from the oven and let them cool slightly on the baking sheet before serving. This brief cooling period allows them to firm up just enough so you can enjoy them without burning your fingers or mouth!
How to Serve and Store Cheesy Halloween Breadstick Bones
This recipe yields 4 servings of delightfully spooky Cheesy Halloween Breadstick Bones, perfect for any festive gathering. For a fun presentation, serve them on a rustic wooden board with a small bowl of marinara sauce for dipping, or pair them with a hearty pumpkin soup that complements their cheesy texture. Garnish with a sprinkle of parsley for an extra touch of color and festivity.
To store leftovers, place the breadsticks in an airtight container and refrigerate for up to 3 days. When you’re ready to enjoy them again, reheat in the oven at 350°F for about 5-7 minutes until warm and crispy, ensuring you retain their delightful texture. While these breadsticks can be frozen, expect some changes in texture once thawed, so it’s best to savor them fresh!
Garlic Mashed Potatoes
Creamy garlic mashed potatoes provide a rich and savory contrast to the cheesy, doughy goodness of the breadstick bones.
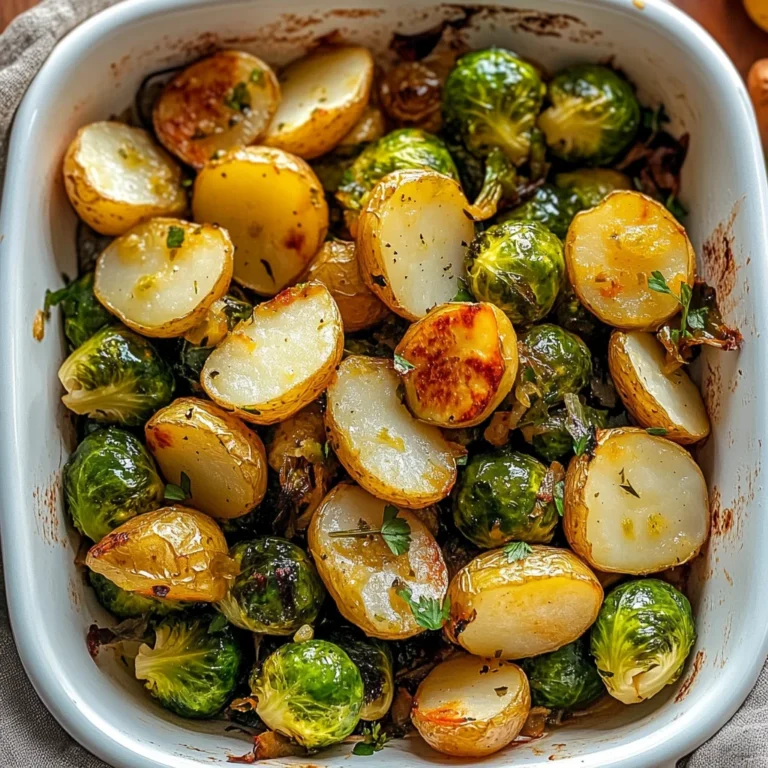
Roasted Brussels Sprouts
The caramelized edges and slightly bitter taste of roasted Brussels sprouts beautifully balance the richness of the cheesy filling.
Marinara Sauce
A zesty marinara sauce adds a tangy kick that perfectly complements the gooey cheese and buttery topping of the breadsticks.
Caesar Salad
Crisp romaine lettuce and garlicky croutons in a creamy Caesar dressing offer a refreshing crunch against the soft texture of the Halloween breadsticks.
Cheesy Polenta
Creamy, cheesy polenta serves as a comforting base that harmonizes with the flavors found in the mozzarella and cheddar used in the breadsticks.
Stuffed Peppers
Savory stuffed peppers filled with rice, beans, and spices create an unexpected yet delightful pairing that adds both color and flavor to your Halloween spread.
Can I use whole wheat flour instead of all-purpose flour? Whole wheat flour can be used, but it may result in denser breadsticks. If you substitute, consider using a mix of whole wheat and all-purpose flour to maintain a lighter texture.
Are these Cheesy Halloween Breadstick Bones suitable for a gluten-free diet? Unfortunately, this recipe is not gluten-free due to the use of all-purpose flour. However, you can try using a gluten-free breadstick dough mix available at most grocery stores as an alternative.
Can I prepare the dough ahead of time and refrigerate it? Yes, you can prepare the dough in advance and refrigerate it after kneading. Just let it rise at room temperature for about 30 minutes before shaping the bones when you’re ready to bake.
How do I know when the breadsticks are done baking? The breadsticks are done when they are golden brown on top and sound hollow when tapped gently. Keep an eye on them during the last few minutes of baking to avoid overcooking.
What can I add to the cheese filling for extra flavor? You can enhance the cheese filling by adding cooked and crumbled bacon, chopped green onions, or even some spicy jalapeños. These additions will give your breadstick bones a unique twist that’s sure to impress at your Halloween party.
Can I use a different type of cheese in this recipe? Absolutely! Feel free to experiment with cheeses like pepper jack for a spicy kick or gouda for a smoky flavor. Just ensure that any cheese you choose melts well to keep the filling gooey and delicious.
Conclusion
Cheesy Halloween Breadstick Bones are the perfect combination of spooky fun and delicious flavor, making them a must-have for your Halloween gatherings. Pair them with delightful dishes like [Pumpkin Soup] or [Spiderweb Taco Dip] to create an unforgettable party spread. We’d love for you to save this recipe on Pinterest and share your spooky creations with us in the comments!
Cheesy Halloween Breadstick Bones
Ingredients
Method
- In a mixing bowl, combine warm water, yeast, and sugar. Let it sit for 5 minutes until frothy.
- Add flour, salt, and olive oil to the yeast mixture. Mix until a dough forms.
- Knead the dough on a floured surface for about 5 minutes until smooth.
- Place the dough in a greased bowl, cover with a cloth, and let it rise for 1 hour or until doubled in size.
- Preheat the oven to 375°F (190°C). Line a baking sheet with parchment paper.
- Once the dough has risen, punch it down and roll it out on a floured surface to about 1/2 inch thick.
- Cut the dough into bone shapes using a knife or pizza cutter.
- Place a small amount of cheese filling in the center of each bone shape and fold the edges over to seal.
- Brush the tops of the breadsticks with melted butter and sprinkle with sea salt and parsley.
- Bake in the preheated oven for 15 minutes or until golden brown.
- Remove from the oven and let cool slightly before serving.