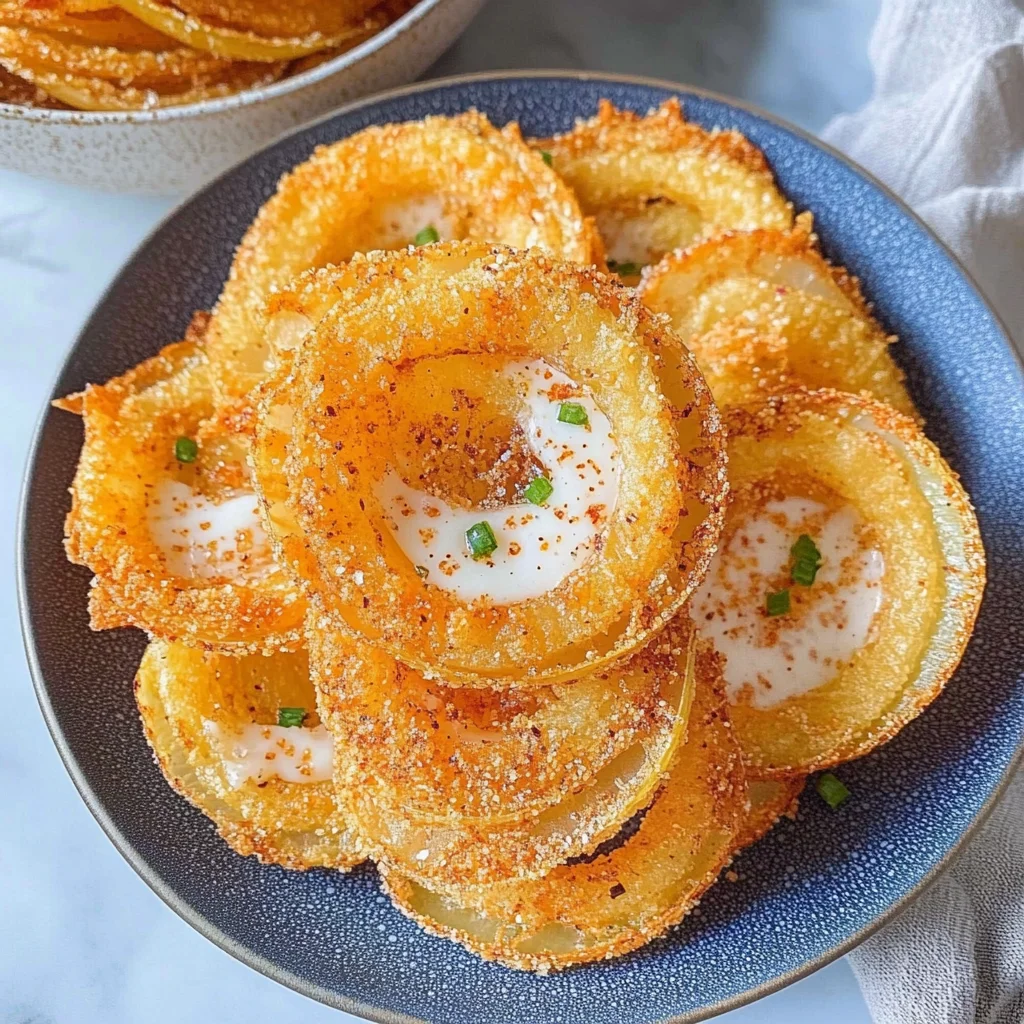
TikTok Onion Ring Chips
If you’re looking for a snack that’s crunchy, cheesy, and utterly addictive, you’ve found it in these TikTok Onion Ring Chips! This recipe has taken the internet by storm, and for good reason. Each chip is a delightful mix of crispy onion flavor and rich parmesan goodness. Whether you’re hosting friends for game night or just need a quick bite after a busy day, these chips are sure to impress.
What makes this recipe really special is how easy it is to whip up. You probably already have most of these ingredients in your kitchen! Plus, they make for a fantastic appetizer at family gatherings or just a fun treat for movie night at home. Trust me, once you try them, they’ll become a favorite for every occasion.
Why You’ll Love This Recipe
- Quick and Easy: With only 15 minutes of prep time, you’ll have these delicious chips ready in no time!
- Family-Friendly: Kids and adults alike will love the crispy texture and cheesy flavor—perfect for sharing!
- Perfectly Crispy: Baking instead of frying means no messy oil splatters while still achieving that satisfying crunch.
- Make Ahead: These chips can be stored easily, making them great for meal prep or snacking throughout the week.
Ingredients You’ll Need
These TikTok Onion Ring Chips come together with simple, wholesome ingredients that pack tons of flavor. Here’s what you’ll need:
- 8 ounces parmesan cheese (freshly grated)
- 3 yellow onions (medium)
- 2 tablespoons avocado oil
- 2 teaspoons paprika (or to taste)
- 1 teaspoon coarse sea salt (or to taste)
- 1 teaspoon garlic powder (or to taste)
- ½ teaspoon seasoning salt (or to taste)
- ¼ teaspoon ground black pepper (or to taste)
Variations
The beauty of these TikTok Onion Ring Chips lies in their versatility! You can easily customize them based on your preferences:
- Add Some Heat: Sprinkle in some cayenne pepper or chili powder for a spicy twist.
- Cheesy Goodness: Mix in a bit of cheddar cheese with the parmesan for an extra layer of flavor.
- Herb Infusion: Toss in some dried herbs like oregano or thyme for an aromatic touch.
- Seasoning Swap: Experiment with different seasoning blends like Italian seasoning or taco seasoning to match your mood!
How to Make TikTok Onion Ring Chips
Step 1: Preheat Your Oven
Start by preheating your oven to 400°F. This step is crucial because it ensures that your chips bake evenly and become perfectly crispy. While the oven warms up, line a large rimmed baking pan with parchment paper so the cheese won’t stick.
Step 2: Prepare the Cheese Layer
Grate your parmesan cheese until you have about 8 ounces. Spread it out in a thin layer over the parchment paper. The cheese acts as a base and will melt into a delicious crunchy layer as it bakes—this is what makes these chips so irresistible!
Step 3: Slice the Onions
Next, slice your yellow onions very thinly—about ⅙ inch wide works best. If you have a mandolin slicer, now’s the time to use it! Lay the onion slices over the melted cheese in a single layer. This allows each chip to get that fantastic onion flavor while baking.
Step 4: Add Flavor
Brush those lovely onion slices with avocado oil to coat them lightly; this helps achieve that golden crispiness we all crave. Then sprinkle paprika, coarse sea salt, garlic powder, seasoning salt, and ground black pepper over the top. Each spice adds its own layer of deliciousness!
Step 5: Bake Until Crispy
Now it’s time to bake! Pop your pan into the oven and let those beauties cook for about 25 to 30 minutes until they’re golden brown and crispy. Once they’re done baking, allow them to cool on the pan for about 10 minutes before breaking them up into chips. The cooling period is essential—it helps them firm up even more!
Enjoy each delightful bite of your homemade TikTok Onion Ring Chips!
Pro Tips for Making TikTok Onion Ring Chips
Making these delicious TikTok Onion Ring Chips is a breeze, but with a few extra tips, you can ensure they turn out perfectly every time!
- Use fresh parmesan: Freshly grated parmesan cheese melts better and gives a crispier texture than pre-packaged options. The flavor is more robust too!
- Slice onions evenly: Aim for consistent thickness when slicing the onions. This ensures even cooking and prevents some chips from burning while others remain undercooked.
- Don’t overcrowd the pan: Give your onion chips room to breathe on the baking sheet. Overcrowding can lead to steaming instead of crisping, resulting in soggy chips.
- Monitor baking time closely: Ovens can vary, so keep an eye on your chips during the last few minutes of baking. You want them golden brown but not burnt!
- Let them cool before breaking apart: Allowing the chips to cool on the pan enhances their crunchiness. This step helps them firm up as they cool down.
How to Serve TikTok Onion Ring Chips
These crispy and flavorful TikTok Onion Ring Chips are perfect for snacking or as a delightful appetizer at gatherings. Presenting them beautifully will make your dish even more inviting!
Garnishes
- Chopped fresh herbs: Sprinkle some chopped parsley or chives on top for a pop of color and freshness that complements the savory flavors.
- Dipping sauces: Consider serving with a side of tangy ketchup or creamy avocado dip to enhance the taste experience and offer different flavor profiles.
Side Dishes
- Fresh garden salad: A light salad with mixed greens, cherry tomatoes, and a simple vinaigrette balances the richness of the onion chips.
- Veggie platter: Arrange colorful vegetables like carrots, bell peppers, and cucumbers alongside hummus for a crunchy, healthy contrast to your onion ring chips.
- Guacamole: The creamy texture of guacamole pairs wonderfully with the crispy chips, creating a delightful combination that’s hard to resist.
- Sweet potato fries: These offer a sweet contrast to the salty onion rings and are perfect for dipping in your favorite sauce.
With these tips and serving suggestions, you’re all set to impress family and friends with your homemade TikTok Onion Ring Chips! Enjoy every crunchy bite!

Make Ahead and Storage
These TikTok Onion Ring Chips are not only fun to make but also perfect for meal prep! You can whip up a batch in advance and enjoy them throughout the week. Here’s how to store, freeze, and reheat your delicious creations.
Storing Leftovers
- Allow the chips to cool completely before storing.
- Place them in an airtight container at room temperature for up to 3 days.
- For longer storage, consider refrigerating them, but be aware that they may lose some crunchiness.
Freezing
- To freeze, lay the cooled chips in a single layer on a baking sheet and freeze for about 1 hour.
- Once frozen, transfer them to a freezer-safe bag or container, ensuring to remove as much air as possible.
- They can be stored in the freezer for up to 2 months.
Reheating
- Preheat your oven to 350°F.
- Place the chips on a baking sheet lined with parchment paper.
- Bake for about 5-7 minutes or until heated through and crispy again.
FAQs
Here are some common questions that might arise as you embark on making your TikTok Onion Ring Chips!
Can I use other types of cheese for TikTok Onion Ring Chips?
While parmesan provides a great flavor and texture, you can experiment with other hard cheeses like pecorino or aged cheddar. Just keep in mind that it may alter the taste slightly.
How do I ensure my TikTok Onion Ring Chips stay crispy?
To keep your onion ring chips crispy, ensure they are completely cooled before storing. If reheating, use an oven instead of a microwave, as this helps restore their crunchiness.
Are TikTok Onion Ring Chips healthy?
These chips are a healthier alternative to traditional snacks due to their low-carb count and the use of fresh ingredients. However, moderation is key as they still contain cheese and fats.
What can I serve with TikTok Onion Ring Chips?
These chips make a fantastic snack on their own but pair beautifully with dips like guacamole or salsa. They also complement salads or can be served alongside sandwiches.
Final Thoughts
I hope you enjoy making these delightful TikTok Onion Ring Chips as much as I do! They’re crunchy, cheesy perfection that will impress anyone who tries them. Whether you’re snacking alone or sharing with friends, these chips will surely become a new favorite. Happy cooking!
[Snacks]
TikTok Onion Ring Chips

If you’re searching for a snack that delivers a satisfying crunch and savory flavor, look no further than these TikTok Onion Ring Chips. This trending recipe has captured the hearts of snack enthusiasts everywhere with its irresistible combination of crispy onions and rich parmesan cheese. Perfect for game nights, movie marathons, or just a quick treat after a busy day, these chips are incredibly easy to make using simple ingredients you likely already have in your kitchen.
- Prep Time: 15 minutes
- Cook Time: 30 minutes
- Total Time: 45 minutes
- Yield: About 4 servings 1x
- Category: Snack
- Method: Baking
- Cuisine: American
Ingredients
- 8 ounces freshly grated parmesan cheese
- 3 medium yellow onions
- 2 tablespoons avocado oil
- 2 teaspoons paprika
- 1 teaspoon coarse sea salt
- 1 teaspoon garlic powder
- ½ teaspoon seasoning salt
- ¼ teaspoon ground black pepper
Instructions
- Preheat oven to 400°F and line a baking pan with parchment paper.
- Spread grated parmesan cheese evenly on the parchment.
- Thinly slice the onions (about ⅙ inch) and arrange them on top of the cheese.
- Brush onion slices with avocado oil and sprinkle with paprika, sea salt, garlic powder, seasoning salt, and black pepper.
- Bake for 25 to 30 minutes until golden brown and crispy. Allow cooling for about 10 minutes before breaking into chips.
Nutrition
- Serving Size: 1 oz (28g)
- Calories: 110
- Sugar: 0g
- Sodium: 240mg
- Fat: 8g
- Saturated Fat: 4g
- Unsaturated Fat: 4g
- Trans Fat: 0g
- Carbohydrates: 2g
- Fiber: 0g
- Protein: 9g
- Cholesterol: 20mg