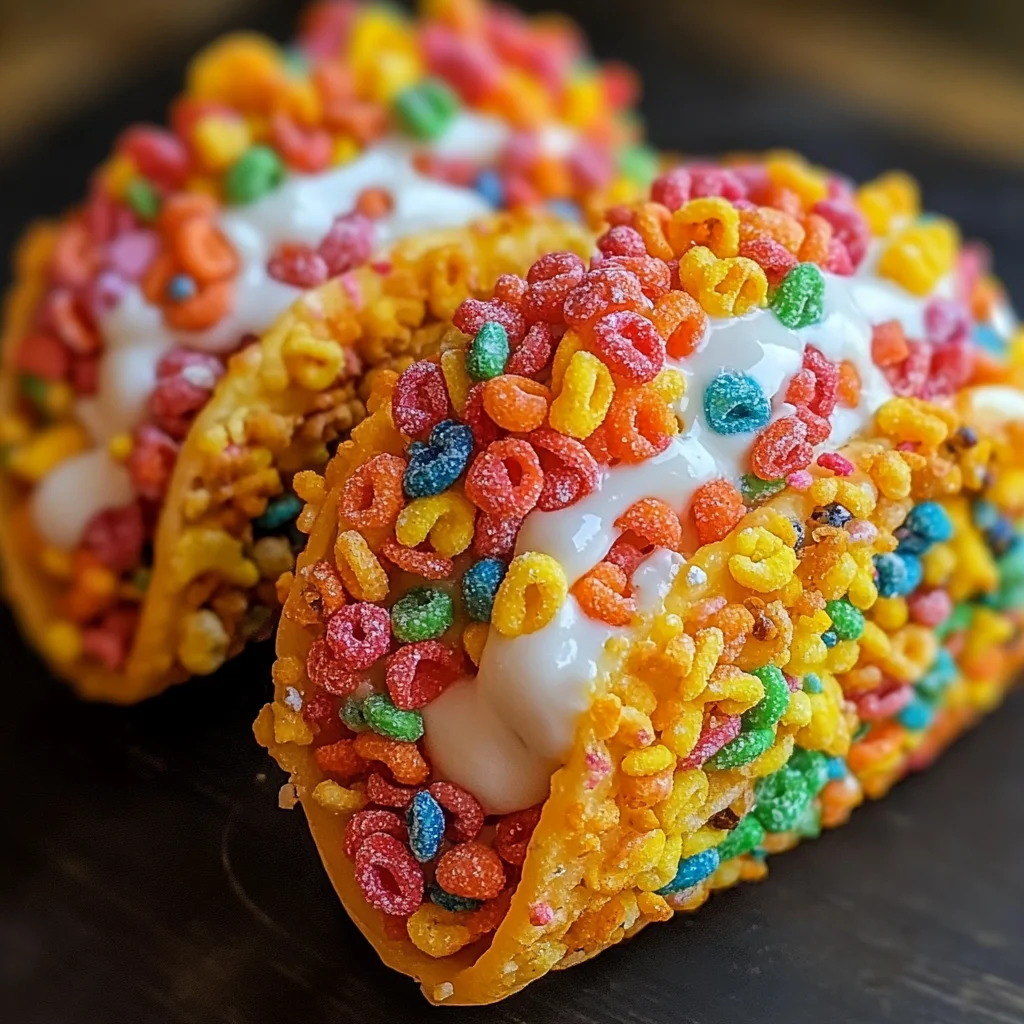
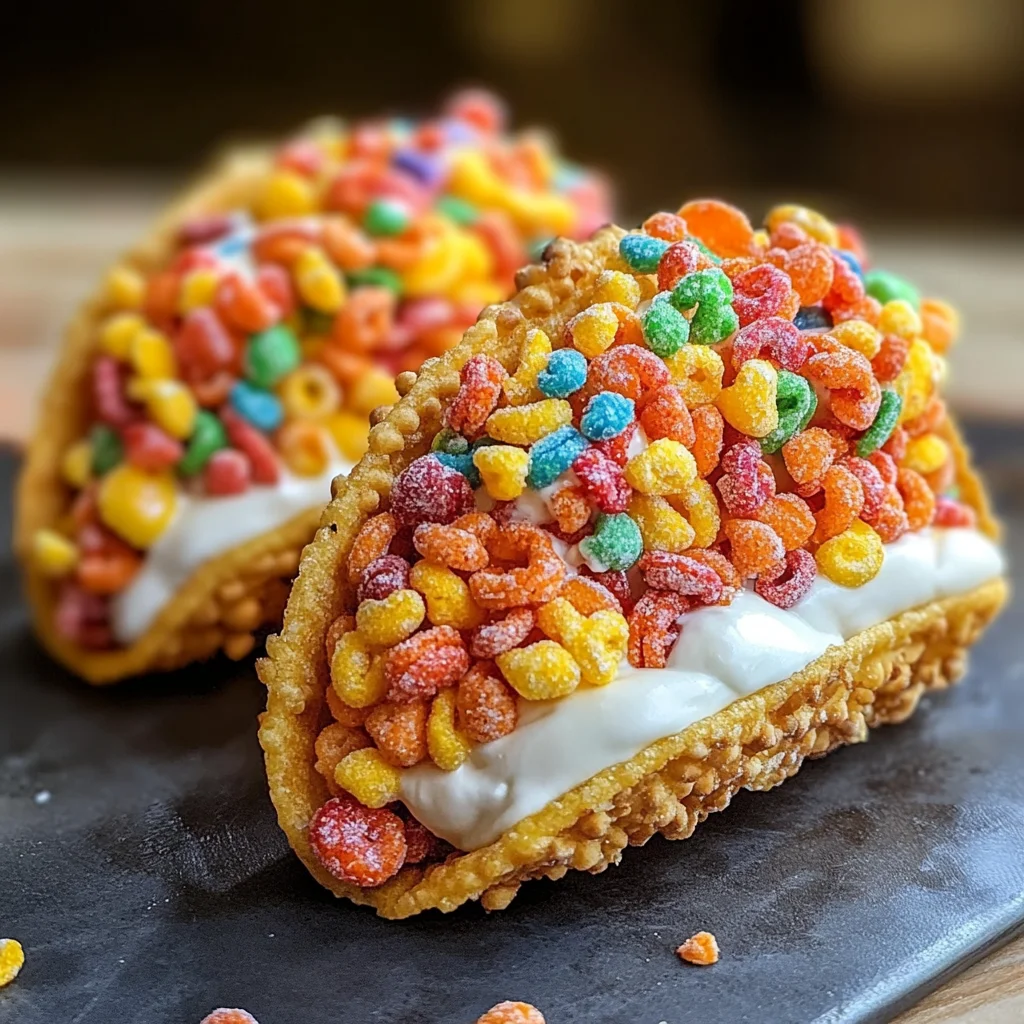
Fruity Pebbles Cheesecake Tacos
If you’re looking for a dessert that brings joy and nostalgia in every bite, you’ve come to the right place! These Fruity Pebbles Cheesecake Tacos are not just a treat; they are a delightful experience that will have everyone smiling. Combining the colorful crunch of fruity cereal with the creamy goodness of cheesecake, this fun twist on dessert is perfect for family gatherings or those busy weeknights when you need something quick and delicious. Trust me, once you try these playful tacos, they’ll become a favorite in your home!
These little delights are not only easy to whip up but also a great way to get the whole family involved in the kitchen. Kids love helping out, whether it’s mixing the ingredients or decorating their very own taco creations. So roll up your sleeves and let’s dive into this scrumptious recipe!
Why You’ll Love This Recipe
- Easy to Make: This recipe comes together in under an hour, making it perfect for last-minute dessert cravings.
- Family-Friendly Fun: The vibrant colors and interactive assembly process make these tacos a hit with kids and adults alike!
- Make Ahead Option: Prepare the shells and filling ahead of time, so all you have left is assembling them when you’re ready to serve.
- Delicious Flavor: With a creamy cheesecake filling and crunchy fruity cereal, each bite is a delightful blend of textures and tastes!
Ingredients You’ll Need
Making these Fruity Pebbles Cheesecake Tacos is super simple since we’re using wholesome ingredients that you can easily find at your local grocery store. Gather these goodies, and let’s create some magic!
For the Taco Shells
- 3 cups fruity cereal
- 1/2 cup unsalted butter, melted
For the Cheesecake Filling
- 8 oz cream cheese, softened to room temperature
- 1/2 cup powdered sugar, sifted
- 1 tsp pure vanilla extract
- 1 cup whipped cream
For Topping
- Additional fruity cereal
Variations
The beauty of these Fruity Pebbles Cheesecake Tacos lies in their flexibility! You can easily switch things up based on what you have on hand or your personal preferences.
- Add Different Cereals: Swap in other colorful cereals for a unique twist—think rainbow or chocolate flavors!
- Experiment with Flavors: Try adding lemon zest or cocoa powder to the cheesecake filling for a refreshing or chocolatey kick.
- Top It Off: Use different toppings like sprinkles, fresh fruit slices, or even mini chocolate chips for extra fun!
- Dairy-Free Option: Substitute cream cheese with a dairy-free alternative and use coconut whipped cream for a vegan-friendly version.
How to Make Fruity Pebbles Cheesecake Tacos
Step 1: Prepare the Taco Shells
Start by combining the fruity cereal and melted butter in a mixing bowl. Stir until every piece of cereal is coated evenly. This step is crucial because it helps create that satisfying crunch we all love! Once mixed well, press this mixture firmly into small taco-shaped molds or muffin tins. Compacting it tightly ensures your shells hold their shape beautifully once chilled.
Step 2: Chill the Taco Shells
Place your taco molds in the refrigerator for at least 30 minutes. Chilling allows the buttery cereal mixture to firm up nicely. You want them to be sturdy enough to hold that delicious cheesecake filling without falling apart!
Step 3: Make the Cheesecake Filling
Using a hand mixer, beat the softened cream cheese until it’s light and fluffy. This makes your filling rich and creamy! Gradually add in sifted powdered sugar and vanilla extract while mixing until everything is smooth. This process helps incorporate air into the mixture so it stays light.
Step 4: Fold in Whipped Cream
Gently fold in the whipped cream using a spatula. Be careful not to deflate it too much; we want that airy texture! This step gives our cheesecake filling its cloud-like consistency that pairs perfectly with our crunchy taco shells.
Step 5: Assemble Your Tacos
Once your cereal shells are nice and firm, it’s time for assembly! Spoon the luscious cheesecake filling generously into each shell. Don’t be shy—fill them up!
Step 6: Add Colorful Toppings
Finally, sprinkle additional fruity cereal over each filled shell for that extra pop of color and crunch. Serve immediately for maximum enjoyment or chill them again if you prefer a firmer texture. Enjoy every delightful bite!
Now you’ve got yourself an exciting dessert that’s sure to impress everyone around your table!
Pro Tips for Making Fruity Pebbles Cheesecake Tacos
Making Fruity Pebbles Cheesecake Tacos is a delightful experience, and with these pro tips, you’ll elevate your dessert game even further!
- Use Fresh Ingredients: Always opt for fresh cream cheese and whipped cream. This ensures that your cheesecake filling has a rich and creamy texture that enhances the overall flavor.
- Chill the Shells Well: Allowing the cereal shells to chill for at least 30 minutes helps them firm up, making them easier to fill without crumbling. A well-chilled shell provides the perfect crunch!
- Customize Your Toppings: Feel free to get creative with toppings like colorful sprinkles or fresh fruit. This not only adds visual appeal but also enhances the texture and flavor of each bite.
- Experiment with Flavors: While the classic cheesecake filling is delicious, consider adding flavored extracts like almond or lemon for a unique twist. This can make your tacos even more exciting!
- Serve Immediately for Best Texture: These tacos are best enjoyed right after preparing them. If you let them sit too long, the shells may become soggy, so serve them fresh for maximum crunch!
How to Serve Fruity Pebbles Cheesecake Tacos
Presenting your Fruity Pebbles Cheesecake Tacos in an appealing way can make them even more enticing! Here are some fun ideas on how to serve this colorful dessert.
Garnishes
- Whipped Cream: A dollop of whipped cream on top adds a luscious finish and makes each taco feel extra special.
- Colorful Sprinkles: Adding rainbow sprinkles not only enhances the visual appeal but also brings a fun crunch to every bite.
Side Dishes
- Fresh Fruit Salad: A light fruit salad made with berries and melons offers a refreshing contrast to the sweet tacos while providing a burst of natural flavors.
- Vanilla Ice Cream: Serve alongside creamy vanilla ice cream for an indulgent treat that complements the fruity flavors perfectly.
- Chocolate Dipping Sauce: A small bowl of melted chocolate for dipping can add another layer of richness that pairs wonderfully with the sweetness of the cheesecake.
- Coconut Whipped Cream: For a tropical twist, try serving with coconut whipped cream. Its lightness and subtle coconut flavor pair beautifully with fruity desserts.
With these serving suggestions and pro tips, your Fruity Pebbles Cheesecake Tacos will not only taste fabulous but look absolutely stunning as well! Enjoy every delightful bite!
Make Ahead and Storage
These Fruity Pebbles Cheesecake Tacos are not only fun to make but also perfect for meal prep! You can easily prepare these delightful treats ahead of time, making them a great option for parties or family gatherings.
Storing Leftovers
- Store any leftover tacos in an airtight container in the refrigerator.
- Consume within 2-3 days for the best taste and texture.
- If you notice the shells getting soggy, consider separating the filling and shells before storing.
Freezing
- These tacos can be frozen if you want to prepare them well in advance.
- Wrap each taco individually in plastic wrap and place them in a freezer-safe bag.
- They will keep well in the freezer for up to 1 month.
Reheating
- For best results, allow frozen tacos to thaw in the fridge overnight before serving.
- If desired, you can briefly warm them in a microwave (around 10-15 seconds) if you prefer a softer shell.
- Avoid reheating the cheesecake filling directly; instead, enjoy it cold or at room temperature.
FAQs
Here are some common questions that might help you with your Fruity Pebbles Cheesecake Tacos experience!
Can I use different cereals for Fruity Pebbles Cheesecake Tacos?
Absolutely! Feel free to get creative with your choice of cereal. Just ensure it has a similar texture and sweetness to fruity cereal for the best results.
How long can I store Fruity Pebbles Cheesecake Tacos?
You can store them for 2-3 days in an airtight container in the refrigerator. For longer storage, consider freezing them.
What toppings pair well with Fruity Pebbles Cheesecake Tacos?
You can add fresh fruit like strawberries or bananas, chocolate chips, or even sprinkles for an extra touch of color and flavor!
Are Fruity Pebbles Cheesecake Tacos kid-friendly?
Yes! These colorful treats are perfect for kids and can even be a fun cooking activity together. They love both making and eating these delightful desserts!
Can I make the filling dairy-free?
Certainly! You can substitute cream cheese with a dairy-free alternative and use coconut whipped cream in place of regular whipped cream.
Final Thoughts
I hope you find joy in making these Fruity Pebbles Cheesecake Tacos! They’re not just a dessert; they’re an experience filled with color and creativity that brings back childhood memories. Whether you’re preparing them for a special occasion or just treating yourself, I’m sure they’ll bring smiles all around. Enjoy every bite, and feel free to share your creations with friends and family!
Fruity Pebbles Cheesecake Tacos

If you’re in search of a fun and colorful dessert that delights both kids and adults, look no further than Fruity Pebbles Cheesecake Tacos! These playful treats combine the vibrant crunch of fruity cereal with a rich, creamy cheesecake filling, making them an unforgettable experience at any gathering. Not only are they simple to prepare, but they also encourage family involvement in the kitchen—perfect for creating lasting memories. With options for customization and a quick assembly process, these tacos will quickly become a favorite dessert in your household. Dive into this delightful recipe and watch everyone smile with each delicious bite!
- Prep Time: 20 minutes
- Cook Time: 0 minutes
- Total Time: 20 minutes
- Yield: Makes approximately 6 tacos 1x
- Category: Dessert
- Method: No-bake
- Cuisine: American
Ingredients
- 3 cups fruity cereal
- 1/2 cup unsalted butter, melted
- 8 oz cream cheese, softened
- 1/2 cup powdered sugar
- 1 tsp pure vanilla extract
- 1 cup whipped cream
- Additional fruity cereal for topping
Instructions
- In a mixing bowl, combine fruity cereal and melted butter until evenly coated. Press the mixture firmly into taco-shaped molds or muffin tins.
- Chill the taco shells in the refrigerator for at least 30 minutes until firm.
- Beat softened cream cheese until light and fluffy. Gradually add powdered sugar and vanilla extract until smooth.
- Gently fold in whipped cream until well combined.
- Once the shells are firm, spoon the cheesecake filling into each shell generously.
- Top with additional fruity cereal before serving.
Nutrition
- Serving Size: 1 taco (60g)
- Calories: 180
- Sugar: 10g
- Sodium: 100mg
- Fat: 9g
- Saturated Fat: 5g
- Unsaturated Fat: 4g
- Trans Fat: 0g
- Carbohydrates: 22g
- Fiber: <1g
- Protein: 3g
- Cholesterol: 30mg