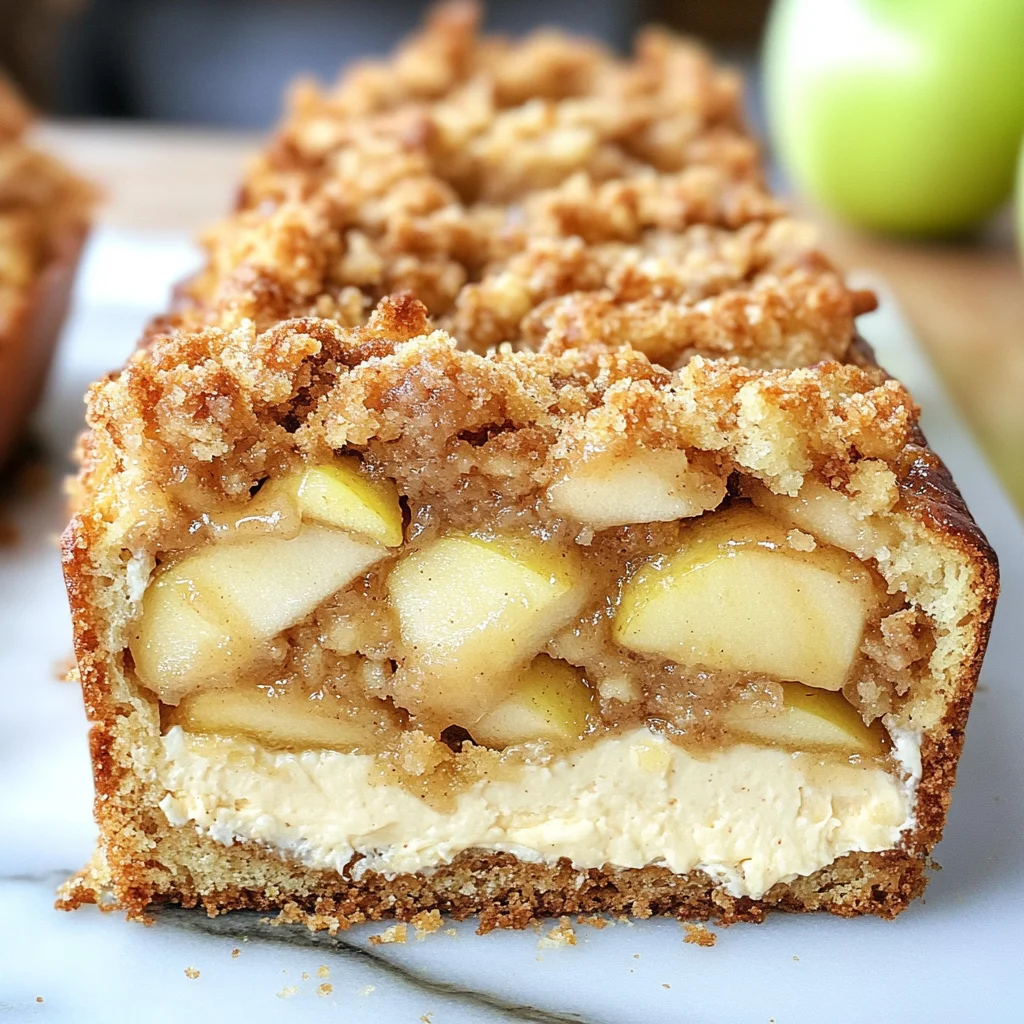
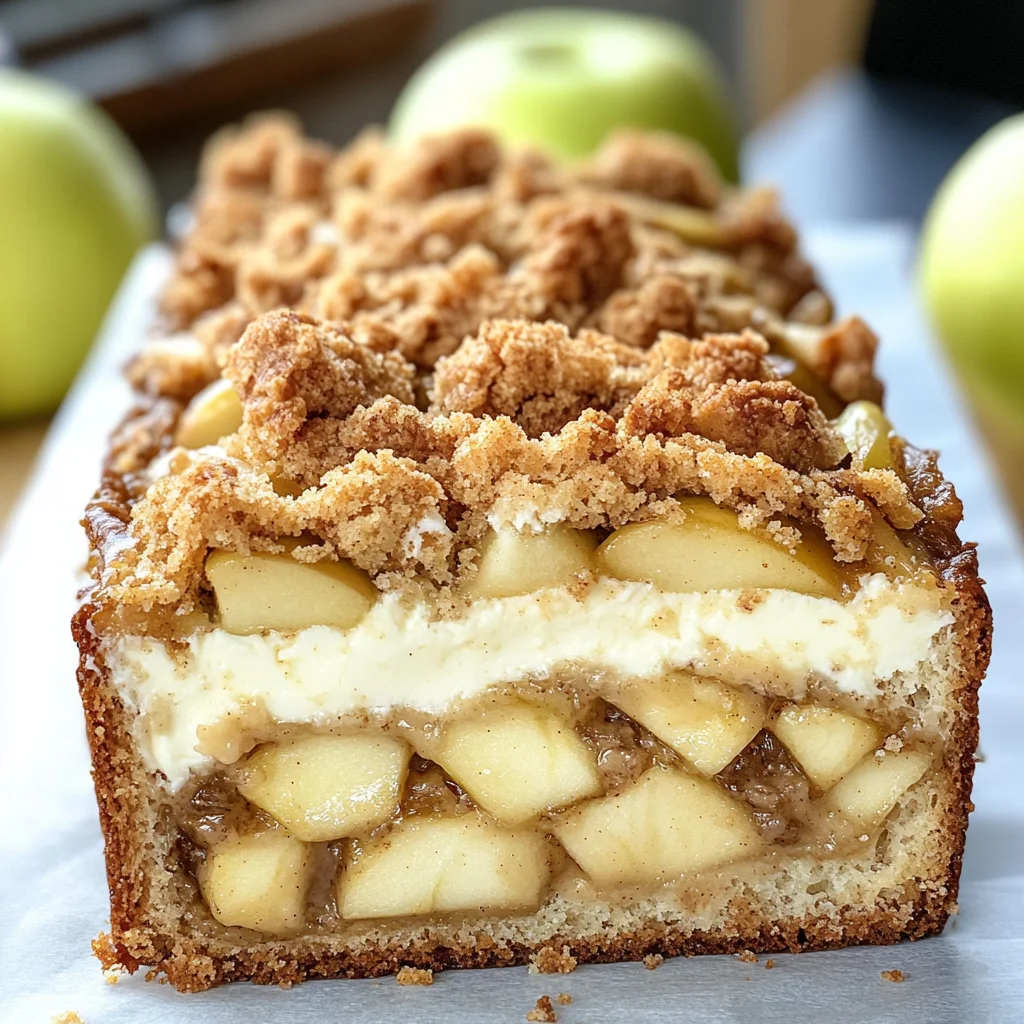
Apple Crisp Cheesecake Bread
If you’re looking for a cozy, delicious treat to warm your home this fall, then you’ve stumbled upon the perfect recipe: Apple Crisp Cheesecake Bread! This delightful blend combines the comforting flavors of apple crisp with a creamy cheesecake filling, all wrapped up in a sweet loaf that tastes like cake. It’s not just a treat; it’s an experience! Whether you’re enjoying it for breakfast on a busy weekday or serving it at a family gathering, this recipe will surely become a favorite.
What I love about this Apple Crisp Cheesecake Bread is how easy it is to make and how everyone who tries it can’t help but smile. The combination of moist bread, tender apple chunks, and that irresistible crispy topping creates a symphony of flavors. Trust me; once you take your first bite, you’ll want to share it with friends and family!
Why You’ll Love This Recipe
- Easy to Prepare: With simple steps and straightforward ingredients, baking this bread is a breeze!
- Family-Friendly: Kids and adults alike will adore the sweet taste and delicious aroma that fills your kitchen.
- Perfect for Any Occasion: Serve it as a breakfast treat, an afternoon snack, or even as dessert—it’s versatile!
- Make-Ahead Convenience: Bake it in advance and enjoy it throughout the week for quick breakfasts or dessert.
- Mouthwatering Flavor: The combination of apples, cream cheese, and crisp topping makes every slice unforgettable!
Ingredients You’ll Need
Let’s gather some simple, wholesome ingredients to whip up this delightful Apple Crisp Cheesecake Bread. Most of these items are staples in any kitchen, making preparation easy and stress-free.
For the Crisp Topping
- 1/3 cup all-purpose flour
- 1/3 cup quick cooking oats
- 1/3 cup light brown sugar
- ¾ teaspoon ground cinnamon
- ¼ teaspoon ground nutmeg
- 3 Tablespoons unsalted butter (melted)
- 3 Tablespoons light brown sugar
- ¾ teaspoons ground cinnamon
For the Apple Filling
- 2 medium apples (Granny Smith or Gala) – peeled and diced into ½ inch pieces
- 2 Tablespoons granulated sugar
- 1 teaspoon ground cinnamon
For the Cheesecake Mixture
- 8 oz. brick-style cream cheese (room temperature)
- 1/3 cup granulated sugar
- 3 Tablespoons all-purpose flour
- 1 teaspoon vanilla
- 1 egg
- ¾ cup powdered sugar
- 2 Tablespoons milk or cream
- ½ teaspoon vanilla extract
For the Bread
- 1 ½ cups all-purpose flour
- 1 ½ teaspoons baking powder
- ½ teaspoon salt
- ½ cup unsalted butter (room temperature)
- 2/3 cup sugar
- 2 eggs (room temperature)
- 1 ½ teaspoon vanilla extract
- ½ cup milk
Variations
The beauty of this recipe is its flexibility! You can easily add your personal touch to make it even more special. Here are a few fun ideas:
- Add Nuts: Stir in some chopped walnuts or pecans for extra crunch.
- Spice It Up: Mix in some ginger or cardamom for an added flavor twist.
- Dried Fruits: Toss in some raisins or dried cranberries for additional sweetness.
- Gluten-Free Option: Substitute all-purpose flour with your favorite gluten-free blend to make it suitable for gluten-sensitive friends.
How to Make Apple Crisp Cheesecake Bread
Step 1: Prepare Your Pan
Grease a 9 x 5-inch loaf pan with baking spray. Line the bottom and sides with parchment paper, leaving an overhang on each side. This will help you lift the bread out easily once it’s baked! Then, preheat your oven to 350°F and adjust the rack just below center.
Step 2: Make the Crisp Topping
In a bowl, combine the flour, oats, light brown sugar, cinnamon, and nutmeg. Pour in the melted butter and mix until crumbly. Set aside while you prepare the other components of your bread.
Step 3: Prepare the Apples
In another bowl, toss the diced apples with granulated sugar and cinnamon. This will enhance their natural sweetness while adding flavor.
Step 4: Mix the Bread Batter
In a large mixing bowl, whisk together flour, baking powder, and salt. In another bowl, cream together room temperature butter and sugar until light and fluffy. Beat in eggs one at a time followed by vanilla extract and milk. Gradually mix in dry ingredients until combined.
Step 5: Make the Cheesecake Filling
In a separate bowl using an electric mixer (or by hand if you’re feeling strong!), beat together cream cheese, granulated sugar, flour, vanilla extract, egg, powdered sugar, milk or cream until smooth.
Step 6: Layer It All Together
Pour half of your bread batter into your prepared pan. Next comes half of the cheesecake mixture followed by half of the apple filling. Repeat these layers until everything is used up! Finish off by sprinkling that crunchy topping on top.
Step 7: Bake Your Bread
Place your loaf pan in the oven and bake for about an hour or until golden brown on top. A toothpick inserted into the center should come out clean when it’s ready!
Enjoy this scrumptious Apple Crisp Cheesecake Bread warm from the oven or let it cool completely before slicing. You might want to make two loaves because trust me; one won’t last long!
Pro Tips for Making Apple Crisp Cheesecake Bread
Baking can sometimes feel daunting, but with a few helpful tips, you’ll be well on your way to creating the perfect Apple Crisp Cheesecake Bread!
- Use Fresh Apples: Fresh apples not only add delightful flavor but also maintain a pleasant texture in the bread. Granny Smith or Gala apples work beautifully, bringing a nice balance of sweetness and tartness.
- Soften Your Cream Cheese: Allowing your cream cheese to come to room temperature before mixing ensures a smooth and creamy filling. This step prevents lumps and creates that heavenly cheesecake layer we all love.
- Don’t Overmix the Batter: Overmixing can lead to dense bread; instead, mix until just combined. A few flour streaks are okay! This keeps your bread light and cake-like.
- Check for Doneness Early: Ovens can vary, so start checking your bread about 10 minutes before the suggested baking time. Insert a toothpick into the center—if it comes out clean or with a few moist crumbs, it’s ready!
- Cool Completely Before Serving: Letting the bread cool in the pan for about 15 minutes before transferring it to a wire rack helps it set up nicely. This prevents it from falling apart when sliced.
How to Serve Apple Crisp Cheesecake Bread
Serving Apple Crisp Cheesecake Bread is all about presentation and the right accompaniments that enhance its deliciousness. Here are some ideas to elevate your experience!
Garnishes
- Whipped Coconut Cream: A dollop of whipped coconut cream adds a light and airy touch that complements the richness of the cheesecake filling.
- Caramel Drizzle: A drizzle of homemade or store-bought caramel sauce provides a sweet finish and enhances the flavors of both apple and cinnamon.
- Cinnamon Sugar Dusting: Sprinkling a bit of cinnamon sugar on top adds an extra layer of flavor while looking beautiful on the plate.
Side Dishes
- Fresh Fruit Salad: A light fruit salad with seasonal fruits like berries or melon complements the sweetness of the bread and adds freshness.
- Vanilla Ice Cream: A scoop of dairy-free vanilla ice cream brings a creamy contrast to the warm bread, making each bite luxurious and comforting.
- Coffee or Tea: Serving this bread alongside a warm cup of coffee or herbal tea makes for an inviting breakfast or afternoon snack.
- Yogurt Parfait: Layering yogurt with granola and fresh fruit creates a delightful contrast in texture and flavor, making it perfect as a breakfast side dish.
Now that you have all these tasty serving suggestions, gather your loved ones around for what’s sure to be a cherished addition to your fall baking repertoire! Enjoy every slice!
Make Ahead and Storage
Apple Crisp Cheesecake Bread is perfect for meal prep! You can easily make it ahead of time and enjoy it throughout the week or even share it with friends and family.
Storing Leftovers
- Allow your bread to cool completely.
- Wrap it tightly in plastic wrap or aluminum foil.
- Store in an airtight container at room temperature for up to 3 days.
- For longer storage, refrigerate for up to a week.
Freezing
- Cut the bread into slices for easy thawing.
- Wrap each slice individually in plastic wrap, then place them in a freezer-safe bag or container.
- Label with the date and freeze for up to 3 months.
- To prevent freezer burn, ensure all air is removed from the bag.
Reheating
- Remove the desired amount from the freezer and let it thaw in the refrigerator overnight.
- For quick reheating, preheat your oven to 350°F (175°C).
- Place slices on a baking sheet and warm for about 10-15 minutes until heated through.
- You can also microwave individual slices for about 20-30 seconds.
FAQs
Here are some common questions you might have about this delicious recipe!
What makes Apple Crisp Cheesecake Bread so moist?
This recipe includes both apples and a creamy cheesecake filling, which keeps the bread incredibly moist. The butter also adds richness, while the addition of milk enhances the texture.
Can I use other fruits besides apples in Apple Crisp Cheesecake Bread?
Absolutely! While apples bring a wonderful flavor, you can experiment with other fruits like pears or peaches. Just ensure they are firm enough to hold their shape during baking.
How long does Apple Crisp Cheesecake Bread last?
When stored properly, this delightful bread will last at room temperature for up to 3 days. If refrigerated, it can last up to a week. For even longer storage, consider freezing it!
Final Thoughts
I hope you find joy in baking this Apple Crisp Cheesecake Bread! It’s not only a delightful treat but also a wonderful way to celebrate the flavors of fall. Whether you enjoy it as breakfast or dessert, I encourage you to give it a try. Happy baking!
Breakfast
Apple Crisp Cheesecake Bread
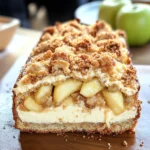
Apple Crisp Cheesecake Bread is the ultimate cozy treat for fall, merging the beloved flavors of apple crisp with a rich cheesecake filling, all enveloped in a moist sweet loaf. Each slice offers a delightful blend of tender apples, creamy cheesecake, and a crunchy topping that will have everyone reaching for seconds. Perfect for breakfast, an afternoon snack, or dessert, this recipe is as versatile as it is delicious. Easy to prepare and enjoyably shareable, it’s guaranteed to warm your home and heart.
- Prep Time: 30 minutes
- Cook Time: 60 minutes
- Total Time: 1 hour 30 minutes
- Yield: Serves approximately 12 slices 1x
- Category: Dessert
- Method: Baking
- Cuisine: American
Ingredients
- 1 ½ cups all-purpose flour
- ¾ cup granulated sugar
- 2 medium apples (peeled and diced)
- 8 oz brick-style cream cheese (room temperature)
- ½ cup unsalted butter (softened)
- 2 eggs
- 1 teaspoon vanilla extract
- Quick oats for the topping
Instructions
- Preheat oven to 350°F (175°C) and grease a 9 x 5-inch loaf pan.
- Prepare the crisp topping by mixing flour, oats, brown sugar, cinnamon, nutmeg, and melted butter until crumbly; set aside.
- Toss diced apples with granulated sugar and cinnamon in a bowl.
- In a mixing bowl, combine flour, baking powder, and salt. In another bowl, cream butter with sugar until fluffy. Add eggs one at a time, then mix in vanilla extract and milk. Gradually incorporate dry ingredients.
- Beat cream cheese with granulated sugar, flour, vanilla extract, egg, powdered sugar, and milk until smooth.
- Layer half the bread batter into the pan followed by half the cheesecake mixture and half the apple filling; repeat layers. Top with crisp mixture.
- Bake for about 60 minutes or until golden brown; check doneness with a toothpick.
Nutrition
- Serving Size: 1 slice (70g)
- Calories: 230
- Sugar: 15g
- Sodium: 180mg
- Fat: 10g
- Saturated Fat: 6g
- Unsaturated Fat: 4g
- Trans Fat: 0g
- Carbohydrates: 32g
- Fiber: 1g
- Protein: 3g
- Cholesterol: 40mg